Account Center
Manage your license, subscription, credits, and support tickets.
Welcome back
Sign in to manage your account
Reset your password
We’ll send a magic link to your email
Create new password
Choose a secure password for your account
Welcome back
Here’s an overview of your account
Quick Actions
Common tasks you might want to do
Account Details
Cloud backup
Your project backup is stored privately. Say “sync” in the writing system to back up. Use Retry Backup Setup in the launcher if you need to reconnect.
Contact and Address
Update your email, phone number, and shipping information for author copies.
Cloud backup contents
Browse the files and folders in your private backup. Say “sync” in the writing system to back up changes.
Branch: main
Invoice History
View and download your past invoices
Payment method
Card on file for your subscription. Update or add a card below.
Credits
Credits are applied automatically when you submit a Prep for Publication, audio, or proof print job.
Your cart
Generates both DOCX and PDF review artifacts. EPUB, MOBI, audiobook, and author print are available after approval.
Automated proof copies during Prep for Publication. Print cost is added at checkout.
Generate narrated audio of short stories.
Your License Key
We do not store your license key. Email a new key to replace your old one.
Loading...
Lost your key? Request a new one below and we’ll email it to you. Your old key will be replaced.
License Status
Download Launcher
Subscribers get the latest version; one-time purchasers get the version that was current when they purchased.
Install and open the launcher
Click Launch editor and type: Setup my workspace
Lost your download link? Use “Email me a new license key” above, then in the launcher enter that key. The launcher will get a fresh download link.
Need help with your license?
If you’re having trouble activating your license or need to transfer it to a new computer, our support team can help.
Your Support Tickets
Track the status of your support requests
You haven’t submitted any support tickets yet.
Need help? Create a ticket below and we’ll get back to you.
Create a Support Ticket
Describe your issue and we’ll respond within 1-2 business days
Your Feature Requests
Suggest improvements or new features. We track these as feature requests in our backlog.
You haven’t submitted any feature requests yet.
Have an idea? Submit a feature request below.
Submit a Feature Request
Describe the feature or improvement you’d like. We use these to plan future updates.
Welcome
I built this writing system for authors who want structure, guidance, and momentum without having to learn anything technical. If you can write a sentence, you can use this.
Start here
You’ve downloaded this folder and opened it in a writing editor like VS Code. The first thing I want you to know is this:
You’re just setting up a workspace where your story can grow.
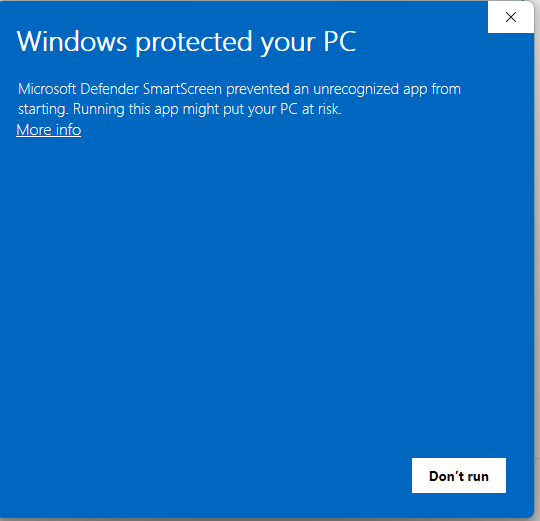
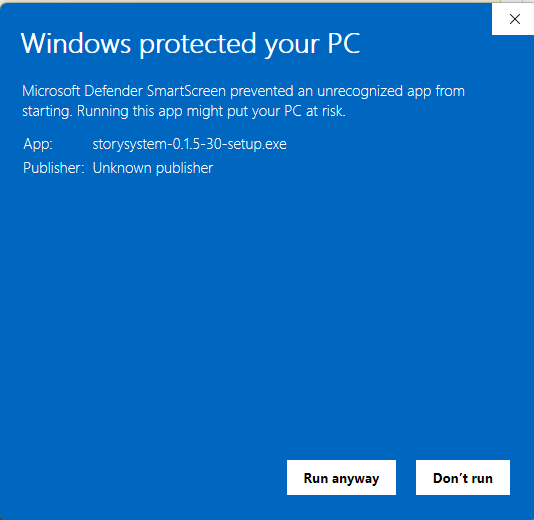
Security warning
Your system may show a security warning when you first run the app. This is normal for small software publishers. The app is safe and signed by Story Production System.
What this system is
This system lets you talk naturally in chat to start and guide your writing. You do not need to memorize commands. The system listens for what you are trying to do and responds.
Project backups
Your writing workspace is backed up automatically to a private cloud managed by the system. You do not need to create any accounts or configure anything.
- A private backup space is created for your license during onboarding.
- Your config file includes your backup credentials.
- When you sync your project, your work is stored safely in the cloud.
Learn more about backups in the Backups guide.
Understanding costs
Your subscription gives you access to the system (license, updates, support). Everything you generate locally is text-based (drafts, reports, marketing copy, cover prompts, YouTube scripts). Audio narration and Prep for Publication are separate add-ons: you purchase credits for them in your Account Center.
Included in your subscription:
- System updates – Access to the latest version
- Premium support – Direct support ticket system
Add-ons (purchase credits):
- Audio narration – Server-side MP3 generation of your chapters
- Prep for Publication – Professional DOCX formatting
Features that do NOT cost extra (local, text-only):
- Drafting and writing (uses your editor’s built-in AI)
- Editing team feedback (uses your editor’s built-in AI)
- Marketing kit content (copy, keywords, ads, social hooks, YouTube scripts, and cover prompts in
covers/cover-prompts.md; all written by your editor’s AI) - Discussion mode (uses your editor’s built-in AI)
- Backups to your private cloud storage
- Quick export (just say “export my manuscript”)
Add-ons like narration and Prep for Publication run on the server. Purchase credits in your Account Center to use them. See Addons for details.
Premium features
Your subscription includes system updates and premium support. Audio narration and Prep for Publication are add-ons: you purchase credits for them separately in your Account Center. They run on the server and require an active license.
- Included in subscription: System updates, Premium support (support tickets, license management)
- Add-ons (purchase credits): Audio narration jobs (MP3s of chapters), Prep for Publication (professional DOCX)
Your license key gives you access to the system. If your subscription lapses, access is suspended until you renew. Your manuscripts and local tools continue to work regardless. Add-on jobs (narration, Prep for Publication) require credits; buy credits in your Account Center. See Addons and Billing for more.
Server-side processing ensures consistent output quality, keeps your local setup simple, and allows features to be updated without requiring you to download anything.
Now open chat
If you have followed along correctly, your config file is saved in the root of this folder and you are ready to go. Open this project folder in your editor (like VS Code or Cursor), then open a chat window.
Say something like “I want to start a new book” or “I’m ready to start writing.” The system will ask you questions about your story, and you should be answering them within minutes. From there you can move on to Drafting, or if you have existing work, see Importing.
Importing Existing Work
If you already have a manuscript, partial draft, or notes from another project, you can bring them into the system instead of starting from scratch.
When to import
Importing is for when you have existing writing you want to work on inside the system. This might be:
- A completed manuscript you want to edit and publish
- A partial draft you want to continue writing
- An outline or notes from a project you started elsewhere
- A story you wrote in Word, Google Docs, or another tool
If you are starting fresh with no existing content, skip this section and go straight to Drafting.
Preparing your files
Before importing, get your manuscript into a simple format the system can read:
- Text files (
.txt) work best - Markdown files (
.md) also work well - Word documents (
.docx) – copy the text into a.txtfile first
If your manuscript has chapters, make sure each chapter starts with a heading like
Chapter 1 or # Chapter One. The system uses these to split your work into separate chapter files.
Where to put your files
The system looks for files to import in a special folder called to-import in your workspace root.
Create this folder if it does not exist, then organize your files inside it:
to-import/books/my-novel/manuscript.txt– for a bookto-import/plays/my-play/script.txt– for a playto-import/short-stories/my-story.txt– for a short story
The folder name (like my-novel) becomes your project name, so choose something descriptive.
How to import
Once your file is in the to-import folder, tell the system you want to bring it in.
Say something like:
- “I have a manuscript I want to import”
- “Import my book from to-import”
- “Bring in the manuscript I put in to-import/books”
- “I have an existing draft I want to work on”
The system will find your file, create a proper project structure, and move your content into the draft/ folder.
What happens during import
When you import, the system:
- Creates a project folder in the right location (Books, Plays, or Short Stories)
- Moves your manuscript into the project’s
draft/folder - Splits chapters into separate files if it detects chapter headings
- Creates skeleton files like
outline.md,characters.md, andnotes.md
The skeleton files will be mostly empty. After import, the system will ask you questions to fill them in, similar to starting a new project.
The system never rewrites your prose during import. It only organizes and structures your files.
After importing
Once import is complete, your project works like any other project in the system. You can:
- Continue drafting new chapters
- Send it to the editing team for feedback
- Generate a marketing kit
- Prep for Publication
The system treats imported work the same as work you drafted from scratch. The only difference is where the words came from.
Drafting Your Book
Once you have set up your workspace, you are ready to start writing. The system guides you through planning and drafting your story one chapter at a time.
Starting a new book
To begin a new project, just say something like:
- “I want to start a new book”
- “I’m ready to start writing”
- “Let’s create a new project”
The system will ask you a few questions at a time to understand your story. It will ask about your title, genre, tone, main characters, and the shape of your plot. You do not need to have everything figured out. Answer what you know, and the system will help you fill in the rest.
Everything you tell the system can be changed later. Think of this as a first sketch, not a final plan.
What gets created
After the interview, the system creates a project folder with several helpful files:
- outline.md – Your chapter plan and story structure
- characters.md – Notes on your main characters
- notes.md – A place for continuity notes and open questions
- plot-summary.md – A short summary of your story arc
- prompt.md – The tone and style guidance the system will follow
Your actual chapters will be written into the draft/ folder as you go.
How drafting works
The system drafts one chapter at a time. When you are ready to write, say something like:
- “Draft chapter 1”
- “Let’s write the prologue”
- “Draft the next chapter”
The system reads your outline, characters, and notes, then writes the chapter.
Each chapter is saved as its own file (like 001-chapter-01.md) so you can review and revise it before moving on.
Making changes as you go
Your outline, characters, and notes are all editable. You can change them by editing the files, or simply tell the system what you want in chat. The system follows your new direction either way.
For example, you can update your characters with natural language, just like everything else:
- “Add that Kieran has a limp from his time in the war”
- “Change Elena’s job to a librarian”
- “Give Jake a younger sister named Sam”
You can adjust your outline or notes the same way. Say what changed and the system will update the right files.
- “Chapter 3 should end with the discovery, not the argument”
- “Add a note: the amulet only works at night”
After each chapter is drafted, the system updates your outline to mark progress and records any continuity notes. That keeps everything consistent as your story grows.
Saving your progress
When you finish working on a chapter or want to take a break, save your work by saying:
- “Save my work” – saves with a note you provide
- “Quick save” – saves immediately without asking
When you say something like “I’m done with this chapter” or “next chapter”, the system will ask if you want to save before moving on.
When drafting is done
Once you have drafted all your chapters and you are happy with the shape of the story, you are ready for editing. The editing team will review your full manuscript and give you feedback.
Do not rush to editing. Make sure your draft tells the story you want before inviting the editors in. See the Editing guide for the full workflow.
Editing Your Work
When your draft is ready, the system has a built-in editing team that reviews your manuscript and gives you feedback you can accept or reject, one change at a time.
What the editing team does
The editing team is a group of AI editors, each with a specific role. They read your entire manuscript and create reports with suggestions. You stay in control. You decide which suggestions to accept.
The team includes:
- Developmental Editor – Reviews structure, plot, pacing, and character arcs
- Line Editor – Reviews language, voice, clarity, and prose quality
- Continuity Editor – Checks timeline, facts, world rules, and consistency
- Sensitivity Reviewer – Reviews cultural sensitivity and problematic dynamics
- Proofreader – Catches grammar, typos, and final polish items
- Marketing Director – Reviews market positioning and trope analysis
How to start editing
When you have a draft and you are ready for feedback, just tell the system. You do not need to memorize a command. Say something natural, like:
- “I’m ready for editing”
- “Send this to the editors”
- “Ready for the editing team”
- “Let’s have the editing team look at this”
- “Start editing”
It will ask if you want to begin the editing review process. Say yes, and the editors will get to work.
Reviewing the suggestions
After the editors finish, the system will ask which editor you want to review first. When you pick one, the system applies that editor’s suggestions to your draft files.
Your editor will show you the changes as colored diffs (red for removed text, green for added text). You go through each change and accept or reject it. Nothing is permanent until you accept it.
After editing
Once you have reviewed all the editors’ suggestions, your manuscript is ready for the next step. You can run editing again anytime you make major changes, or move on to marketing when you are satisfied.
The editing process does not save anything automatically. You stay in control of when to save your progress.
Marketing Your Book
Once editing is complete, the system helps you build a full marketing kit with blurbs, keywords, ad copy, social content, and cover prompts, all based on your actual story.
What the marketing team does
The marketing team reads your finished manuscript and project files to generate assets tailored to your book. They do not guess or use generic templates. Everything they create comes directly from your story’s content, tone, and tropes.
The marketing kit includes:
- Marketing Hooks – One-line hooks, elevator pitches, taglines, and social media copy
- Back Cover Blurb – A polished 150-170 word description ready for retailers
- Keywords – KDP backend keywords, tiered keyword lists, and Amazon category recommendations
- Ad Copy – Multiple versions optimized for Amazon Ads, Facebook, and BookBub
- Social Content – BookTok ideas, caption concepts, and hashtag sets
- Cover Prompts – Detailed prompts for generating or briefing cover art
How to start marketing
When editing is complete and you are ready to prepare for launch, tell the system. You do not need a special command. Say something like:
- “I’m ready for the marketing team”
- “Let’s start marketing”
- “Generate the marketing assets”
- “Create the marketing kit”
It will ask for the project path, then write the full marketing kit (including cover prompts) using your editor’s AI. No cover images are generated; cover prompts in
covers/cover-prompts.md can be used by a designer or external tool.
Where the kit is saved
All marketing assets are written to your project’s Kits/Marketing/ folder:
copy/marketing-hooks.md– Hooks, pitches, and taglinescopy/back-cover-blurb.md– Retailer-ready book descriptionkeywords/targeting-keywords.md– All keyword research and categoriesads/ad-copy.md– Advertising copy variationssocial/social-content.md– Social media content ideassocial/youtube-script.md– YouTube promotional script built from your project knowledgecovers/cover-prompts.md– Detailed cover art prompts (for use by a designer or external tool; no images generated by the system)
What happens next
With your marketing kit complete, you have everything you need to list your book on retailers, run ads, and build buzz on social media. The system does not publish for you. It gives you the materials so you can launch on your own terms.
If you make changes to your manuscript later, you can regenerate the marketing kit to keep everything aligned. When you are ready for the final step, see Publishing for Prep for Publication. Cover and social image generation are available as add-ons (credits).
Publishing Your Book
When your manuscript is edited and your marketing kit is ready, the final step is Prep for Publication into a print-ready document you can upload to retailers like Amazon KDP.
Two ways to finalize
The system offers two approaches to prepare your final deliverables:
Quick export:
- Say “Export my manuscript” or “Create a text file of my book”
- Combines all draft chapters into a single
.txtfile - Generates an
image-prompt.mdwith a ready-to-use AI prompt for your cover - Runs locally with no subscription required
Prep for Publication:
- Say “Submit for Prep for Publication” or “Create the final docx”
- Submits a job to the server for professional formatting
- Produces a formatted
.docxfile based on the 6×9 inch template - Add-on: purchase credits in your Account Center; requires a valid license key. See Addons for details.
What Prep for Publication includes
Prep for Publication takes your draft chapters, cover image, and metadata and assembles them into a formatted
.docx file ready for publishing. The output is formatted for 6×9 inch trim size,
which is the most popular paperback size for fiction and non-fiction alike.
The final document includes:
- Cover page – Your cover image centered on the first page
- Copyright page – Standard legal text with your name, year, and location
- Also By page – Your other published works and upcoming titles
- Table of Contents – Chapter listing with page numbers
- Story text – All your chapters formatted consistently
How to create the final document
When you are ready for Prep for Publication, tell the system. Say something like:
- “Create the final docx”
- “Submit for Prep for Publication”
- “Generate the print-ready file”
- “I’m ready to publish”
The system understands what you need from context. For Prep for Publication, the system submits a job and notifies you when it is ready for download.
Where the file is saved
Prep for Publication runs on the server. Nothing is saved locally.
When the job finishes, we email you so you know it is ready. Then open your Account Center,
go to the Projects tab (Jobs Processing), and download the formatted .docx file from there.
Quick export runs on your machine and saves a .txt file and
image-prompt.md in your project root.
You did it
If you have followed this guide from onboarding through publishing, you have:
- Set up your workspace and configured your keys
- Planned and drafted your book chapter by chapter
- Worked with the editing team to polish your manuscript
- Generated a marketing kit with blurbs, keywords, and cover prompts
- Completed Prep for Publication (print-ready document)
Your book is ready for the world. Congratulations.
Customizing Your System
The system learns your preferences over time. You can teach it rules about your writing style, things to always do, things to never do, and boundaries it should respect.
Why customize
Every author has their own voice and preferences. Maybe you hate adverbs. Maybe you always want chapters to end on a hook. Maybe you never want the system to change your dialogue without asking first.
The system starts with sensible defaults, but it becomes more useful when you teach it your specific rules. Over time, it will draft, edit, and polish in ways that match how you actually write.
How to add a rule
To teach the system something new, just tell it in plain language. Say something like:
- “Add a rule: never use the word ‘suddenly'”
- “Remember that I always want chapters under 3000 words”
- “Add this to my rules: keep dialogue tags simple, just ‘said’ and ‘asked'”
- “I want a rule that my protagonist always speaks in short sentences”
The system will confirm the rule and save it. From then on, it will follow that rule when drafting, editing, and polishing your work.
Once you add a rule, it stays active until you remove it. You do not need to repeat yourself.
Project-specific rules
You can also add rules that apply only to one project (one book). Those rules are used only when you are working in that project. Say something like:
- “Add a rule for this project: never use past tense”
- “For this project only: chapters must end on a cliffhanger”
- “Rule for this book: the detective never carries a gun”
To see or remove project rules, say “List project rules” or “Show rules for this project”, or “Remove a project rule” and the system will show you what applies to the current project.
Project-specific rules are stored with the rest of your rules in the workspace (in .cursor/rules/),
not inside the project folder. Each project gets its own rule file that only applies when you are working in that project.
Types of rules you can add
You can create rules for different aspects of your writing:
- Never do – Things the system should avoid (“Never use em dashes”, “Never start sentences with ‘There was'”)
- Always do – Things the system should consistently follow (“Always use Oxford commas”, “Always end chapters on tension”)
- Tone and voice – How your writing should sound (“Keep a conversational tone”, “Match Hemingway’s sparse style”)
- Formatting – How your text should look (“Single line breaks between paragraphs”, “Chapter titles in title case”)
- Story constraints – Rules about your narrative (“My detective never carries a gun”, “Magic always has a cost”)
- Revision boundaries – Limits on what the system can change (“Never rewrite dialogue without asking”, “Preserve all proper nouns”)
Seeing your rules
To see all the rules you have taught the system, just ask:
- “Show me my rules”
- “What rules have I set?”
- “List my custom rules”
The system will show you every rule you have added, organized by category.
To see only the rules for the current project, say “List project rules”, “Show rules for this project”, “Show me my rules for this project”, or “Show me my rules for <project-name-here>” (e.g. the book title or slug).
Where rules are stored
Author rules (workspace-wide) live in standards/author-rules.md in your workspace.
You can open this file and read it anytime. If you prefer, you can even edit it directly,
though it is easier to let the system manage it for you.
Project-specific rules are stored in .cursor/rules/ in your workspace root,
with the rest of your Cursor rules. They are not stored inside the project folder. Each project has a file
named like project--books--my-book.mdc so the system only applies those rules when you are
working in that project.
author-rules.md
and .cursor/rules/ folder from an old workspace to bring all your rules with you.
Discussing Feedback
When you get feedback from an editor, you do not have to accept or reject it blindly. You can have a conversation with that editor to understand their thinking and explore alternatives.
Why discuss feedback
Sometimes an editor’s suggestion makes sense immediately. Other times, you are not sure why they flagged something, or you disagree with their approach. That is normal.
Discussion mode lets you:
- Ask an editor to explain their reasoning
- Explore alternative solutions
- Understand industry standards or best practices
- Push back on suggestions you disagree with
- Get additional examples or clarification
The editor will respond in character, drawing on their expertise and the specific feedback they gave you.
How to start a discussion
After you have received feedback from the editing team, you can talk to any editor about their notes. Just say something like:
- “I want to discuss the feedback from the line editor”
- “Can I talk to the developmental editor about their notes?”
- “I have questions for the proofreader”
- “Let me discuss the continuity editor’s report”
The system will load that editor’s report and respond as that editor, ready to have a conversation.
Each editor’s expertise
Each editor brings different expertise to the conversation:
- Developmental Editor – Story structure, character arcs, plot, pacing, stakes, emotional beats
- Line Editor – Prose quality, voice, word choice, sentence rhythm, clarity
- Continuity Editor – Timeline consistency, character details, world rules, internal logic
- Sensitivity Reviewer – Cultural sensitivity, representation, potential reader concerns
- Proofreader – Grammar, punctuation, spelling, mechanical polish
- Marketing Director – Market positioning, tropes, audience expectations, genre conventions
When you discuss feedback, the editor will draw on their specific area of expertise.
When to use discussion mode
Discussion mode is most useful when:
- You do not understand why something was flagged
- You want to explore alternatives before deciding
- You think the editor missed something about your intent
- You want to learn more about craft or industry standards
- You are on the fence about a suggestion
You do not need to discuss every piece of feedback. If a suggestion is clear and you agree with it, just accept it. Save discussion for the notes that need more thought.
Protecting Your Work
Your writing is valuable. The system automatically saves your work to the cloud so you never lose a chapter to a crashed computer, deleted file, or corrupted drive.
How backups work
When you set up the system during onboarding, your work is saved to a private cloud space managed by the system. You control when saves happen, so nothing changes without your say-so.
The system saves:
- Every chapter you draft
- Your outline, characters, and notes
- Editing reports and feedback
- Marketing materials and cover prompts
- Your custom rules and preferences
Only you can see your files. Your manuscripts, notes, and ideas are not visible to anyone else.
When backups happen
You control when your work is saved. Ask the system to save at any time:
- “Save my work” – saves with a note you provide
- “Save my progress” – same as above
- “Backup my changes” – same as above
- “Quick save” or “QS” – saves immediately with “Work in progress” as the note
When you save, the system creates a local snapshot. To back up to the cloud, say:
- “Sync” or “Sync my work”
When you say you are moving to the next chapter (like “I’m done with this chapter” or “next chapter”), the system will ask if you want to save first. This helps you avoid losing work between chapters.
Your writing history
Every time the system saves, it creates a point in time you can return to. This means you can:
- See what your chapter looked like yesterday, last week, or last month
- Recover text you deleted by accident
- Compare different versions of a scene
- Go back to an earlier draft if you change your mind
How you see it: Ask the system in chat. Say something like “Show me what chapter 3 looked like last week”, “What did this chapter look like yesterday?”, or “Can I see the version from before my last save?”. The system will show you the content from that point in time or help you restore it.
Think of it like an unlimited undo button that never forgets.
Recovering lost work
If something goes wrong, whether your computer crashes, a file gets deleted, or you want to undo a big change, your work is safe in the cloud.
To recover, just tell the system:
- “I need to restore my last backup”
- “Can we go back to yesterday’s version of chapter 3?”
- “I accidentally deleted something, can you recover it?”
The system will help you find and restore whatever you need.
Backup credentials are set during onboarding. Manage your account and view sync history in the Account Center.
Hearing Your Words
The system can read your chapters aloud so you can hear how your writing sounds. Listening to your prose catches problems your eyes might miss.
Why listen to your writing
Reading silently and hearing your words out loud are two different experiences. When you listen, you notice things you would otherwise miss:
- Awkward sentences that trip up the voice
- Repetitive words or phrases that become obvious when spoken
- Dialogue that does not sound like real speech
- Pacing problems where the rhythm feels off
- Typos and missing words your brain auto-corrects when reading
Many authors read their work aloud themselves, but having the system do it lets you listen with fresh ears while following along in the text.
How to narrate a chapter
To hear a chapter read aloud, just ask the system. Say something like:
- “Read chapter 3 to me”
- “Narrate this chapter”
- “Generate audio for chapter 5”
- “I want to hear what this sounds like”
The system submits your chapter to the server for processing and returns an MP3 file when the job completes. You can check job status and download the audio when ready.
Audio narration is an add-on. Purchase credits in your Account Center to use it. A valid license key is required. See Addons for how to enable and pay with credits.
Listening while editing
A good workflow is to generate audio after you finish a draft, then listen while reading along. Keep a notepad handy to mark spots that sound wrong.
Common things to listen for:
- Tongue twisters – Sentences that are hard to say
- Echo words – The same word repeated too close together
- Run-on sentences – Phrases that go on too long without a breath
- Flat dialogue – Conversations that sound stilted or unnatural
- Missing beats – Places where the rhythm needs a pause
Talking to the System
The system is designed to understand natural language. Just tell it what you want to do, and it will figure out the rest. You do not need to memorize anything.
How to communicate
The best way to use this system is to talk to it like you would talk to a helpful assistant. Describe what you want in plain language:
The system listens for your intent, not specific keywords. Be natural.
Starting and writing
When you want to work on your book, try phrases like:
- “I want to start a new book”
- “Let’s create a new project”
- “Draft chapter one”
- “Write the next chapter”
- “I have a manuscript I want to import”
Editing and feedback
When your draft is ready for review:
- “I’m ready for the editing team”
- “Send this to the editors”
- “I want to discuss the feedback from the line editor”
- “Show me my editing reports”
Marketing and publishing
When you are ready to prepare for launch:
- “Let’s start marketing”
- “Create the marketing kit”
- “Submit for Prep for Publication”
- “Create the final docx”
- “Export my manuscript”
Audio and polish
For additional features:
- “Read chapter 3 to me”
- “I want to hear what this sounds like”
- “Polish this chapter”
- “Score this chapter for quality”
Rules and customization
To teach the system your preferences:
- “Add a rule: never use the word ‘suddenly'”
- “Show me my rules”
- “Remember that I always want chapters under 3000 words”
Saving your work
To save and back up your progress:
- “Save my work” – saves your changes with a note you provide
- “Save my progress” – same as above
- “Backup my changes” – same as above
- “Quick save” or “QS” – saves immediately without asking for a note
To back up to the cloud:
- “Sync” or “Sync my work” – sends your saved work to the cloud
Moving between chapters
When you finish a chapter and want to move on:
- “I’m done with this chapter”
- “Let’s move to the next chapter”
- “Ready for the next chapter”
- “Next chapter”
When you say any of these, the system will ask if you want to save your current progress first. This helps you avoid losing work when transitioning between chapters.
System and support
For updates and help:
- “Update my writing system”
- “Check for updates”
- “I need help”
- “Something isn’t working”
The system understands context
You do not need to use these exact phrases. The system understands variations and context. “Start a new project”, “begin a book”, and “I want to write something new” all work the same way.
If the system is not sure what you mean, it will ask for clarification. If it misunderstands, just correct it and try again.
Keeping Your System Updated
The writing system improves over time with new features, bug fixes, and better workflows. Updating is safe and never touches your manuscripts or personal settings.
How updates work
When you update, the system downloads the latest release from the server and installs it safely. Your work is protected:
- Never overwritten: Your manuscripts (
my-projects/), client work (client-projects/), and config files - Safe to update: System files like
.cursor/,tools/,scripts/,standards/, andtemplates/
The updater has strict rules about what it can and cannot touch. It will never modify your manuscripts, outlines, or personal notes.
How to update
When you want to check for updates, just tell the system. Say something like:
- “Update my writing system”
- “Check for updates”
- “Is there a new version?”
The system will authenticate with your license key, check if a new version is available, download it, and install it safely.
License key requirement
Updates require a valid license key in your config file.
Make sure it is in your writing-system-config.json:
"web_system": {

                          "base_url": "https://storyproductionsystem.com",

                          "license_key": "ws_your_key_here"

                        }
If your subscription has lapsed, the updater will show a clear message with a link to renew.
Getting Help
If something is not working or you have questions the documentation does not answer, premium support is available to help you get unstuck.
How support works
When you need help, the system can create a support ticket on your behalf. It collects relevant information automatically so you do not have to explain your setup from scratch.
The support request includes:
- Your system version
- Basic environment information (OS, editor)
- Your subject and message
- Optional diagnostic logs (you control what is sent)
Support requests never include your writing, outlines, or personal notes. Only system information and your description of the problem.
How to request support
When you need help, just tell the system. Say something like:
- “I need help”
- “I’m having a problem”
- “Something isn’t working”
- “Can I get support?”
The system will ask you to describe the issue, then create a support ticket. You can track it in your Account Center.
Before requesting support
Many questions can be answered by:
- This guide – Check if your question is covered in one of the pages
- Asking the system – Say “How do I…” or “What does… do?” and the system will explain
- Just trying it – The system understands what you need if you describe it plainly
If you have checked these and still need help, support is here for you.
Feature requests and feedback
Support is also the place to share ideas for improvements. If you think of a feature that would help your workflow, include it in a support request with the subject “Feature Request” and describe what you would like to see.
Your feedback shapes how the system evolves. Every suggestion is read and considered.
Account Center
The Account Center is your hub for managing your subscription, license key, support tickets, and print jobs. Access it through the website to control everything about your account.
Accessing your account
To access your Account Center, visit the website and sign in with your email and password. Once logged in, you will see eight main tabs:
- Overview – Dashboard with subscription status, license, credits, quick actions, and contact/address
- Cloud Backup – Sync and backup settings for your projects
- Projects – Jobs Processing and Generated Assets; track Prep for Publication and narration jobs
- Billing – Subscription, payment method, Credits (purchase and balance by add-on type), and invoice history
- Licenses – View your license key, status, and request a new key by email
- Support – System Guides (this documentation), Support Ticket, and Feature Request
- Library – My Books and order author copies
- Preferences – Default narration voice and other settings
Overview tab
The Overview tab gives you a quick snapshot of your account status:
- Subscription status – Whether your subscription is active
- License status – Whether your license key is valid
- Credits available – Your credit balance for each add-on (Prep for Publication, author proof, audio narrations)
Quick action buttons let you jump directly to common tasks like getting support, viewing guides, checking billing, or copying your license key.
License key
Your license key is what connects your local writing system to your subscription.
You need it in your writing-system-config.json file to use premium features.
In the Licenses tab, you can:
- View your current license key
- Request a new license key by email (this replaces your old key)
- See your license status and subscription type
Click “Email me a new license key” and we will send it to your registered email address. Your old key will stop working once the new one is generated.
Support tickets
The Support tab lets you create and track support tickets directly from the web interface. This is an alternative to saying “I need help” in your editor.
When you open a ticket:
- Add a clear subject line describing your issue
- Provide as much detail as possible in the message
- Track responses in the ticket conversation thread
- Reply directly from the ticket detail view
You can view all your past tickets, see their status (open, pending, or closed), and continue conversations on existing tickets.
Print jobs
Under the Projects tab, Jobs Processing shows the status of any Prep for Publication jobs you have submitted. When you submit for Prep for Publication, the job appears here so you can track its progress.
Job statuses include:
- Queued – Your job is waiting to be processed
- Processing – Your manuscript is being formatted
- Completed – Your file is ready for download
- Failed – Something went wrong (contact support)
Processing typically takes 2-5 minutes depending on book length. Once complete, you can download your formatted file directly from this tab.
Billing and Invoices
The Billing tab shows your subscription costs, payment method, credits, and invoice history. Everything you need to understand what you are paying for.
Billing overview
At the top of the Billing tab, you will see:
- Next billing date – When your next payment will be charged
- Monthly total – Your current subscription cost including any addons
- Customer ID – Your unique identifier in our billing system
Access billing from your Account Center.
Invoice history
Below the overview, you will find a list of all your past invoices. Each invoice shows:
- Invoice number and date
- Amount charged
- Payment status (paid, open, or void)
Click on any invoice to see the full details, including line items that explain exactly what you were charged for.
Understanding prorated charges
If you change your subscription mid-billing cycle (like adding or removing addons), your next invoice may show credits and charges:
- Invoice credits – Refunds for unused time on your previous plan
- Charges – Costs for remaining time on your new plan
The invoice detail view explains these adjustments clearly so you understand why your bill might look different from your usual monthly total.
Every charge is itemized. If something looks wrong, contact support with your invoice number.
Managing Addons
Addons are optional features you purchase with credits. Manage them in your Account Center. They give you access to premium capabilities like Prep for Publication and audio narration.
Available addons
The following addons are available to enhance your writing system:
- Prep for Publication (Coming Soon) – Prepare your manuscripts for publication (review and approval flow). See Publishing. When you submit for Prep for Publication, this addon processes your book on the server.
- Author Proof Prints (Coming Soon) – Automated proof copies during Prep for Publication. Always requires Prep for Publication (we control the book format sent with your proofs).
- Audio Narrations (Coming Soon) – Generate narrated audio of your chapters. See Audio. When you say “read this chapter to me”, this addon creates MP3 files of your writing.
How to manage addons
In the Billing tab, under Credits:
- View your credit balance next to each add-on type (Prep for Publication, Author Proof Prints, Audio Narrations)
- Purchase credits by choosing a quantity and adding to cart, then checkout with your card on file
- Use credits when you run a job (e.g. narrate a chapter or submit for Prep for Publication); one credit is used per job
Credits are applied automatically when you submit a Prep for Publication, audio, or proof print job.
Billing for addons
Add-ons like Audio Narrations and Prep for Publication are paid with credits. Purchase credits in your Account Center when you need them. Your base subscription is separate and does not include add-on usage.
In the Billing tab under Credits you can see your balance for each add-on and purchase more.
Addon requirements
Author Proof Prints always requires Prep for Publication. We use the formatted book from Prep for Publication so we can control the format of the book that gets sent with your Author Proof Prints.
If your subscription ends and you do not restore within the 90-day grace period, your account and credits expire; add-on features become unavailable until you resubscribe.
Print Jobs
Your manuscripts, formatted and ready for print
No print jobs yet
When you submit for Prep for Publication, your review DOCX and PDF will appear here once processing is complete.
From Draft to Print-Ready
The Prep for Publication addon turns your finished manuscript into a professionally formatted document, ready for Amazon KDP or any print-on-demand service. Each submission generates both DOCX and PDF review artifacts.
- Submit for Prep for Publication in the writing system when your manuscript is complete
- We format it with proper margins, page breaks, front matter, and 6×9 trim sizing (DOCX and PDF)
- Download the DOCX and PDF and upload to your publishing platform. EPUB, MOBI, audiobook, and author print are available after approval.
Most books are ready in under 5 minutes.
Generated Assets
Narrated chapters, audio promos, and other server-generated assets appear here for download and review.
No generated assets yet
When you request a narrated chapter (e.g. “Let me listen to chapter 3”) or other generated content, it will appear here once the job completes.
Narrated Chapters
Say something like “Let me listen to chapter 3” in your writing system. The chapter is sent to the server for narration and the MP3 will show up here when ready.
Audio promos and short-form video assets will be added here in future updates.
My Books
Your finished books. Select a book to view details, download files, or order author copies (shipped to your account address).
You have no books in your library yet. Package your book for publishing from your writing system to add it here.
Order author copies
Author copies are shipped to the address on your account. Update your contact details in Overview if needed.
Review editor
Select a book from the Library to review and submit approval. Open a book that has a Prep for Publication job in “Ready for review” or “Awaiting approval” and click “Open in Review Editor”.
Manuscript
Shortcuts: Save (Cmd/Ctrl + S), Undo (Cmd/Ctrl + Z), Redo (Cmd/Ctrl + Shift + Z or Y), Bold (Cmd/Ctrl + B), Italic (Cmd/Ctrl + I).
Exports use your account typography defaults (body, heading, accent) unless overridden per project or pen name.
Pen names
Author names for your projects. Add at least one and set a default for new projects. Changes sync to the SPS app when you use the same account. Use the Typography button next to each pen name to set body, heading, and accent fonts for that pen name; they override account defaults when a project uses that pen name.
Preferences
Your default narration voice is used when you request narration from the editor or from Project Center.
Typography: You can set typography at three levels. Account defaults (below), per pen name (Pen names tab), and per project (per book in Library). Resolution order: project overrides, then pen name, then account. Set account defaults here; use the Pen names tab for per-pen-name typography and the Library book detail for per-project overrides.
Typography (account defaults)
Set default fonts for body text, headings, and accents. These apply across your account. Pen-name and project typography override these when set (resolution: project, then pen name, then account).